Limecraft Edge is a native desktop application designed to securely handle media-intensive workflows on set, on location, or in post-production environments. It enables efficient and secure offloading, backing up and ingesting media to local storages and the collaborative Limecraft Workspace.
Project-related Edge settings are managed centrally via the Limecraft Workspace Settings to ensure a seamless and uniform offload process. This article dives into these centrally managed Edge settings.
By managing settings centrally, you eliminate the risk of different operators using different naming conventions or encoding settings.

Whether you have one Edge instance or ten across different locations, they will all behave identically, ensuring your media is consistent.
TABLE OF CONTENTS
- Edge in the Limecraft Workspace Settings
- Metadata and File Structure
- Ingest and Processing
- Delivery
- Additional Project Governance
Edge in the Limecraft Workspace Settings
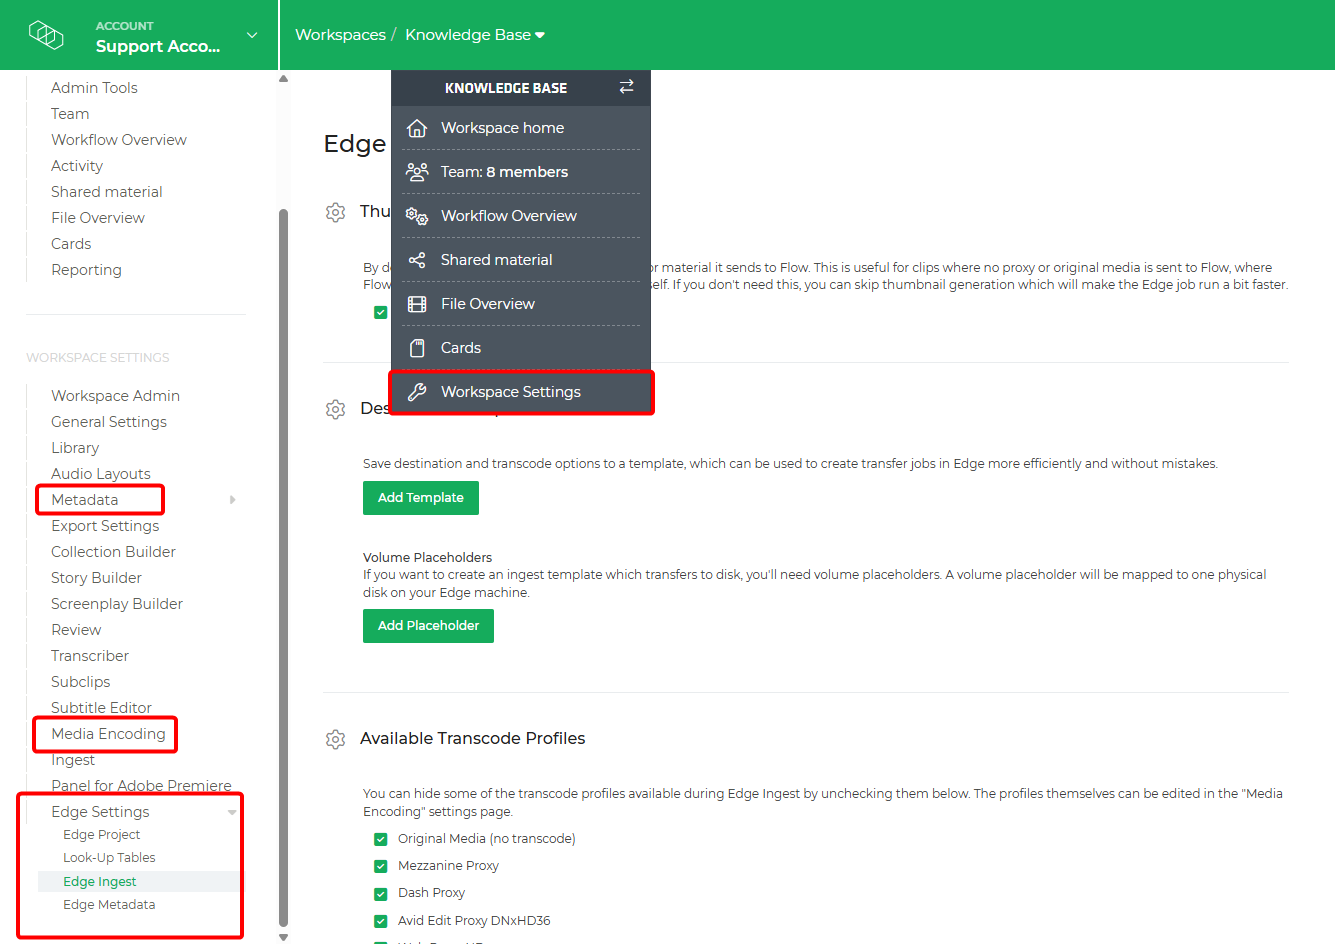
Central Edge settings are managed via the Workspace Settings. You must have at least Workspace Admin permissions to access these controls. If you cannot access these settings, please contact your project administrator.
Access Workspace Settings by clicking the dropdown menu next to the workspace name in the top navigation bar. The screenshot below highligts the primary sections for Edge-related configurations. You can find the main controls under the Edge Settings tab in the left-hand sidebar.
Metadata and File Structure
Defining the required metadata, file path structures, and renaming conventions is a critical step in project setup. These settings ensure your material remains searchable and visible throughout downstream workflows.
Setting Up Edge Metadata and File Path Structure
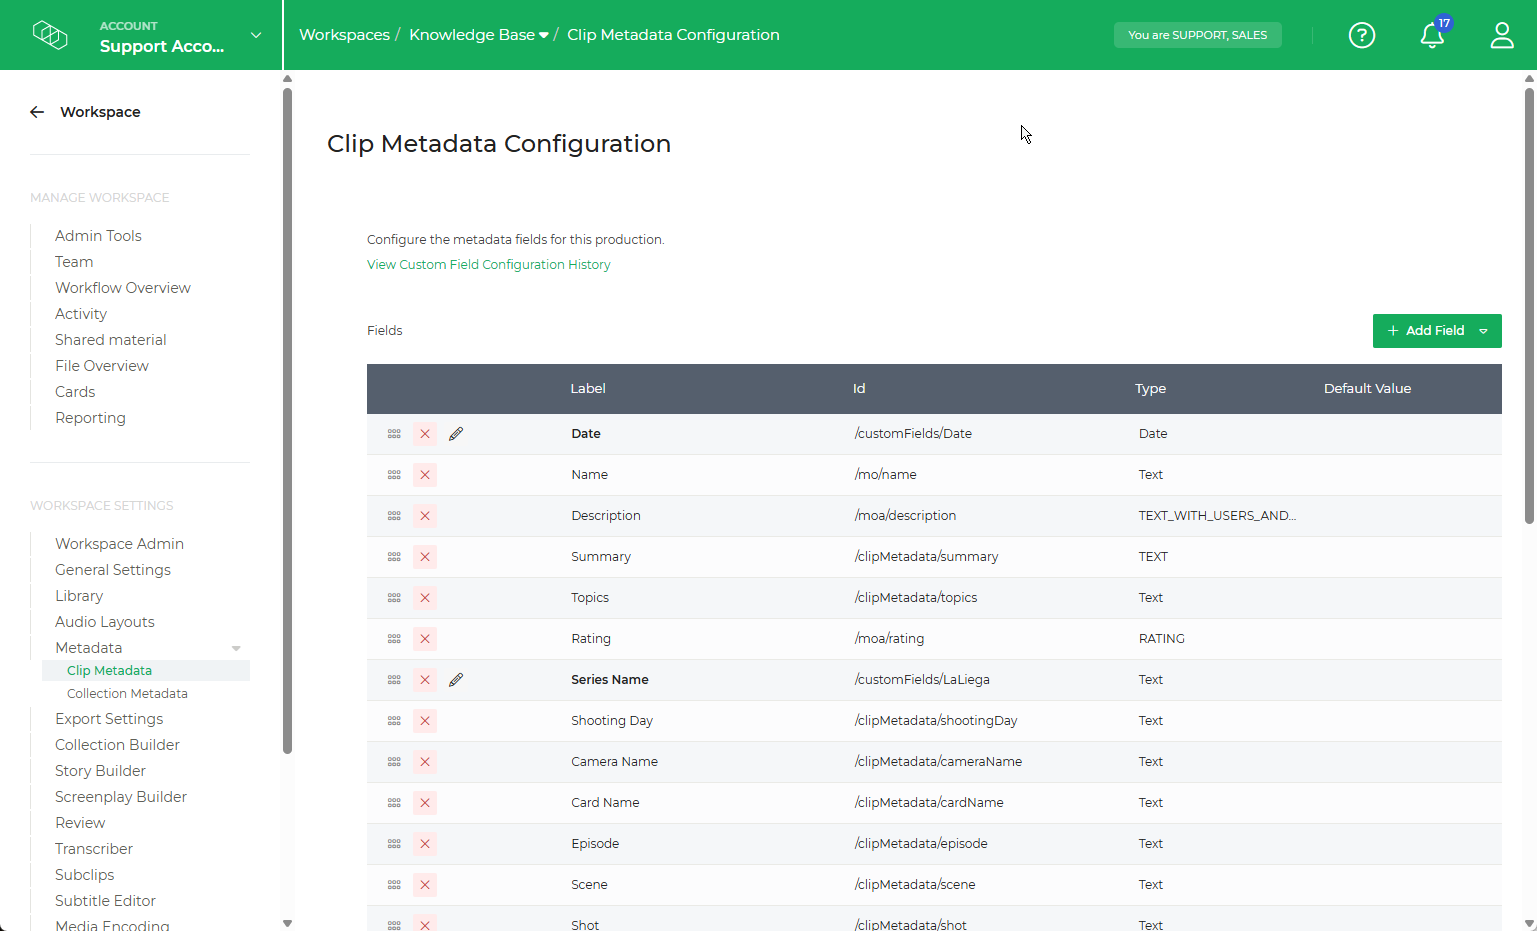
Within the Clip Metadata section of the Workspace Settings, ensure you configure the applicable metadata for your project. For more details instructions, please refer to our Metadata Setup Guide.
In the Edge Metadata settings, you can determine:
- The file path structure for assets imported into Edge.
- How files are organised within the Limecraft Workspace.
- The folder hierarchy on local or shared storage when performing backups or offloading ingested versions.
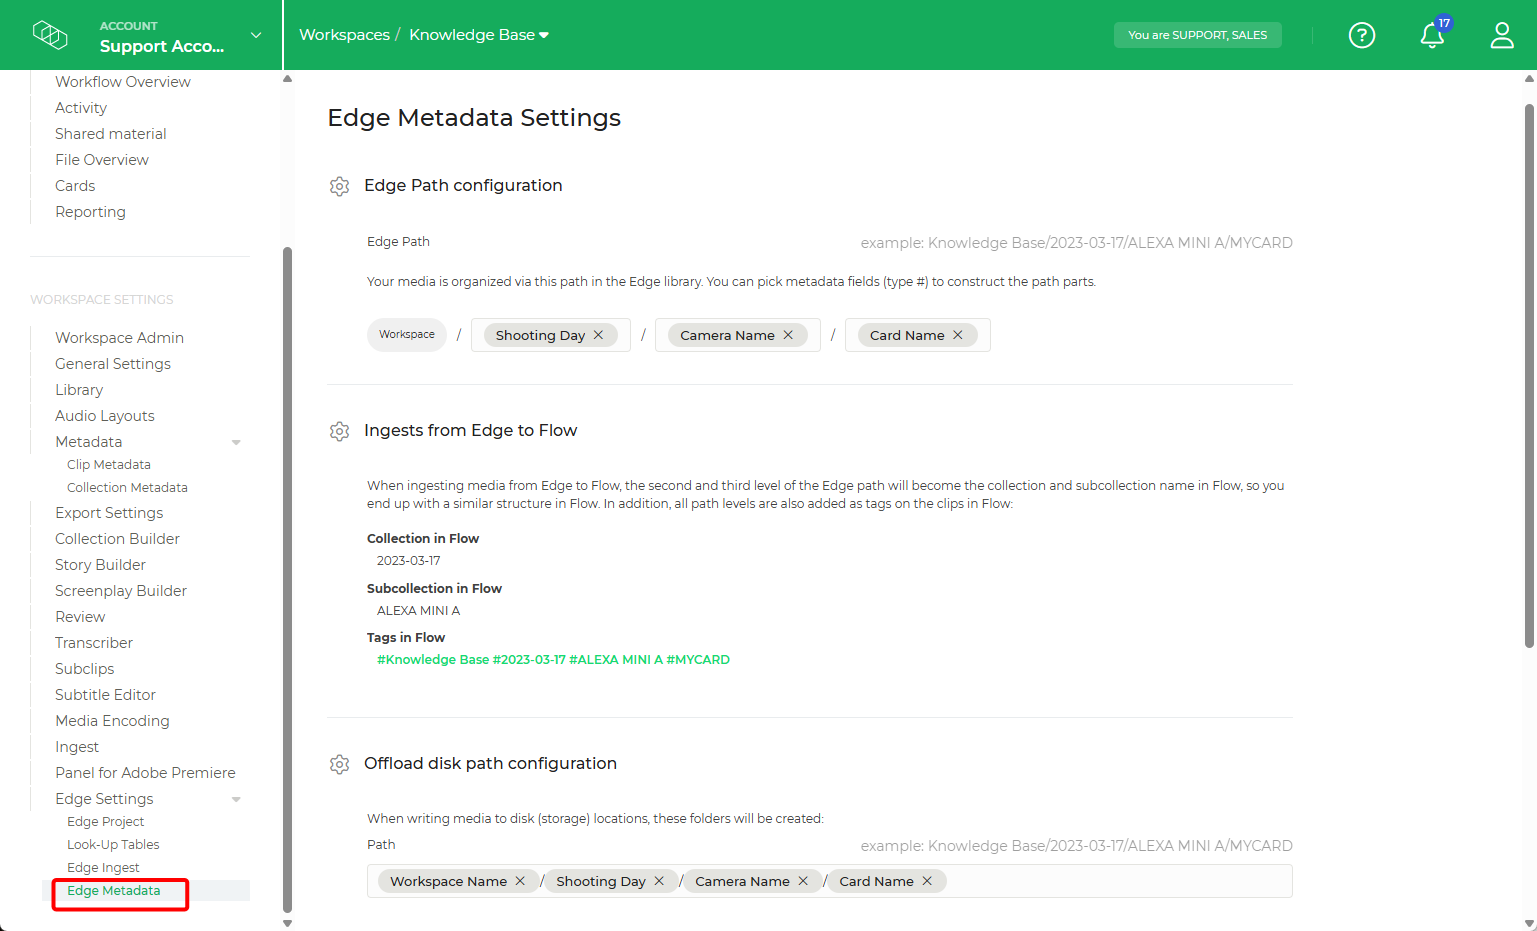
For a step-by-step walkthrough, see our article on Offload Path Configuration.
Setting up Automatic Renaming
Consistent file naming is critical for efficient media management. Clear and predictable names allow production teams to identify, search, and navigate media files with ease throughout post-production, delivery, and archiving.
Allowing Edge to rename files automatically reduces the risk of human error and ensures total consistency across the production workflow.
⚠️Note: Please Keep in mind that Edge does not maintain a record of the original file name once renamed.
Configuration
Navigate to the Automatic Renaming section of the Edge Metadata Settings and select the metadata elements you wish to include in your file name. Using this methods, files are dynamically renamed using the correct metadata at the point of offload and ingest.
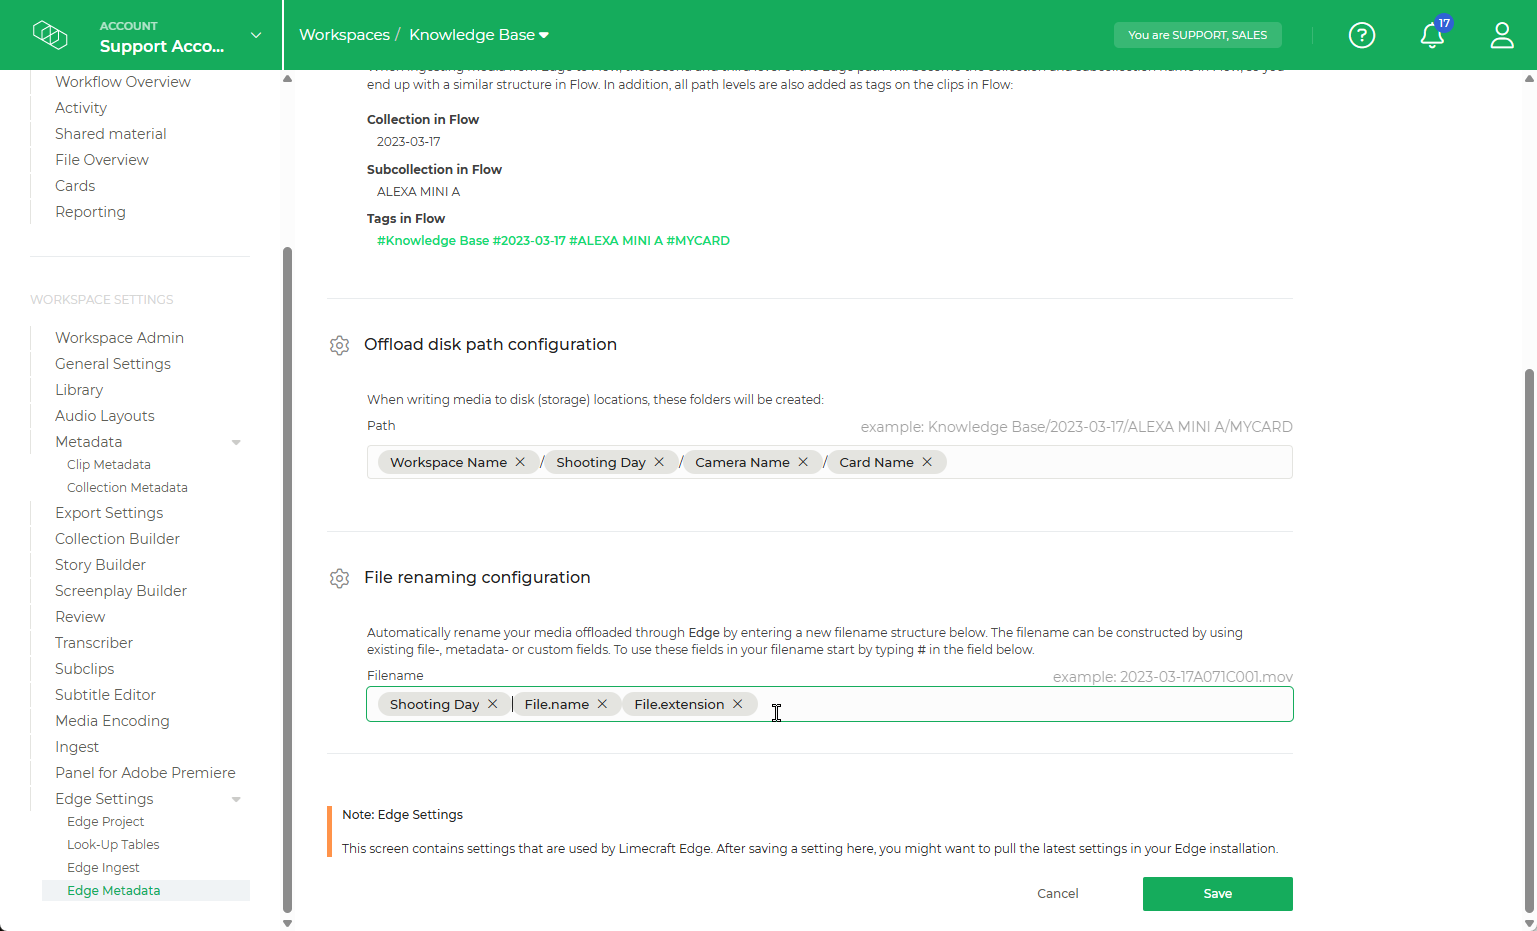
For example, use might include the shooting day and location within the filename. This makes it significantly easier to filter and locate specific clips during downstream processing.
For more complex or advanced use cases, please refer to our guide: Setting up Automatic File Renaming
Ingest and Processing
Limecraft Edge provides the tools to automate the transcoding of your files into various formats. By applying your own LUTs and custom watermarks, you can ensure your media is both stylistically consistent and securely protected throughout the workflow.
Understanding the Ingest Workflow
The ingest process acts as a"gatekeeper" for your media, transforming raw rushes into manageable, production-ready assets.
- Automated Transcoding: Convert high-resolution raw footage into lightweight proxies or high quality edit proxies.
- Colour Management: Apply custom LUTs (Look-Up Tables) during the ingest phase to maintain creative intent from set to post-production.
- Security & Branding: Burn in custom watermarks automatically to track assets and prevent unauthorised distribution.
- Consistency: Use predefined templates to ensure every file is processed with identical settings, regardless of who is operating the stations.
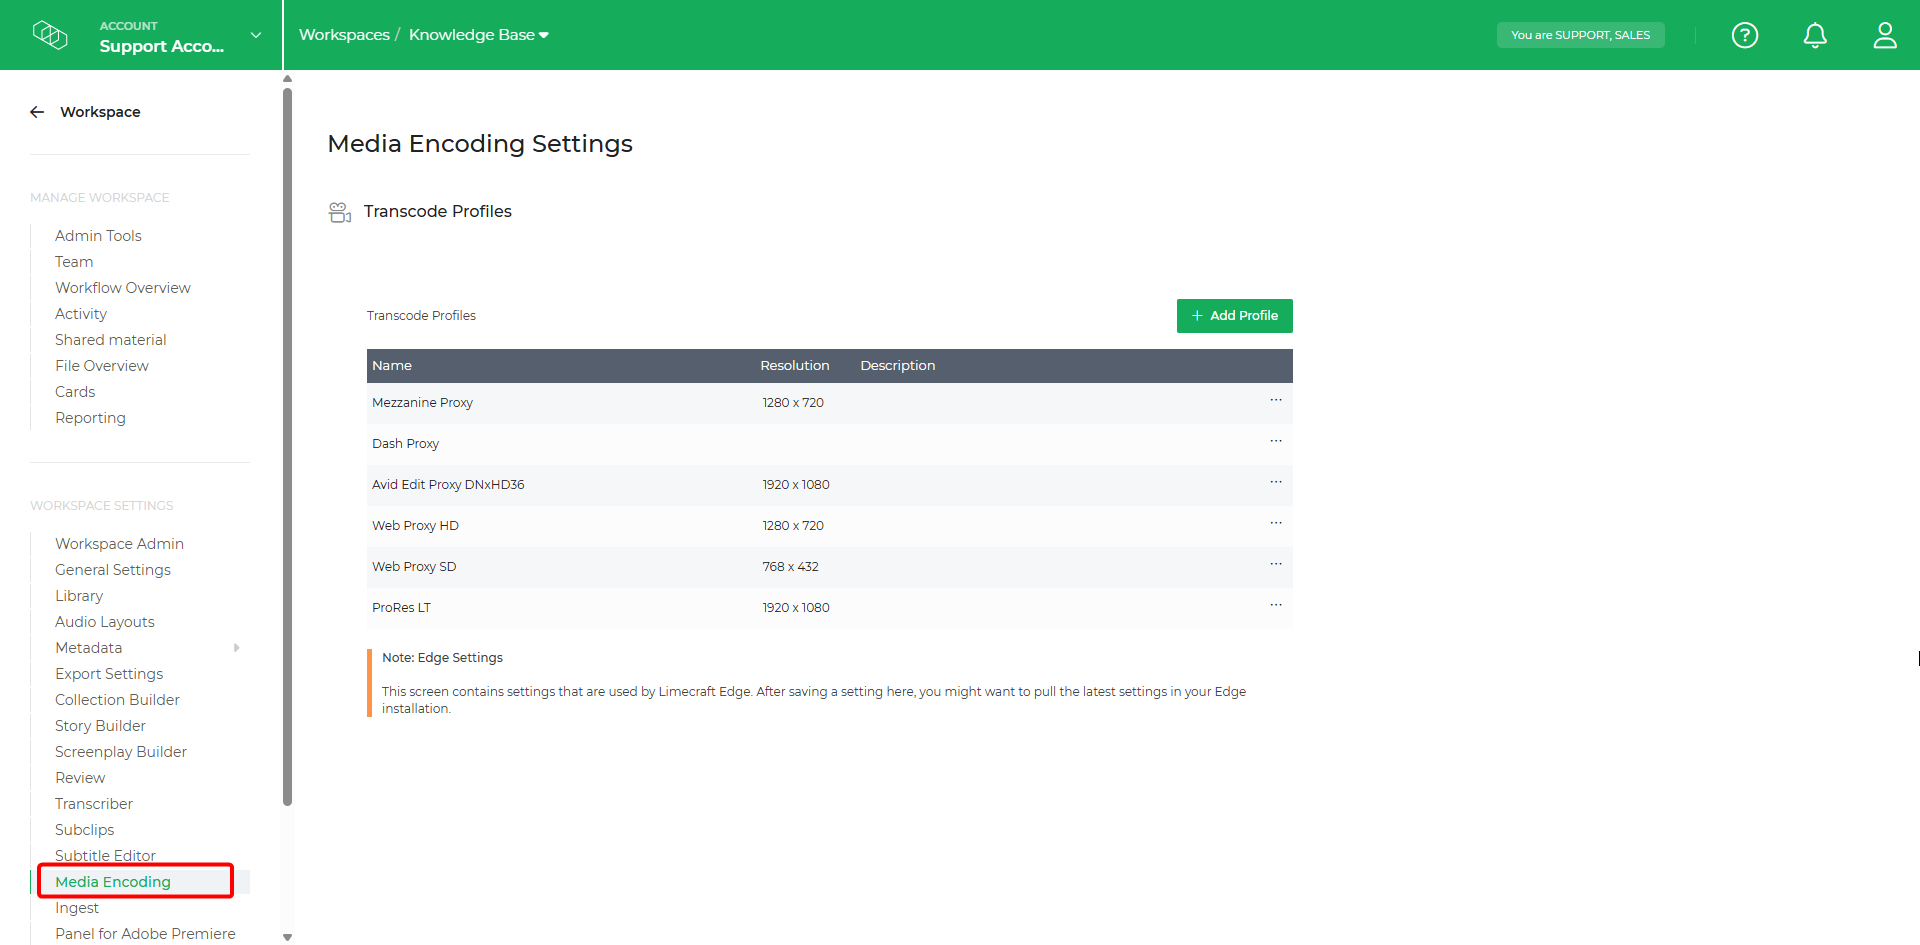
Setting up Encoding Profiles
In the Media Encoding section of your workspace settings, you can customise existing encoding profiles or create new ones tailored to your project's specific requirements.
Properly configuring this section ensures that the correct profiles are available when setting up Ingest Templates. It also guarantees that users have access to the appropriate profiles and delivery destinations when working with Edge.
Professional Configuration
By refining these settings, you enable your DIT (Digital Imaging Technician) to work with maximum efficiency. For example, they can instantly select a preset to transcode raw rushes into Avid proxies and deliver them directly to designated local storage without manual intervention.
⚠️Caution: Expert Knowledge Required. These settings involve technical parameters that directly impact your workflow. If you are unsure about any configuration, please contact our support team for assistance.
For a more comprehensive guide, please refer to our detailed support article: How to configure Media Encoding Profiles.
Configuring Watermarks
Within your Media Encoding settings, you can add watermarks to your transcode profiles to ensure your content is branded and secure. These watermarks are burnt-in during the transcoding process in Limecraft Edge, creating a permanent overlay on the output files.
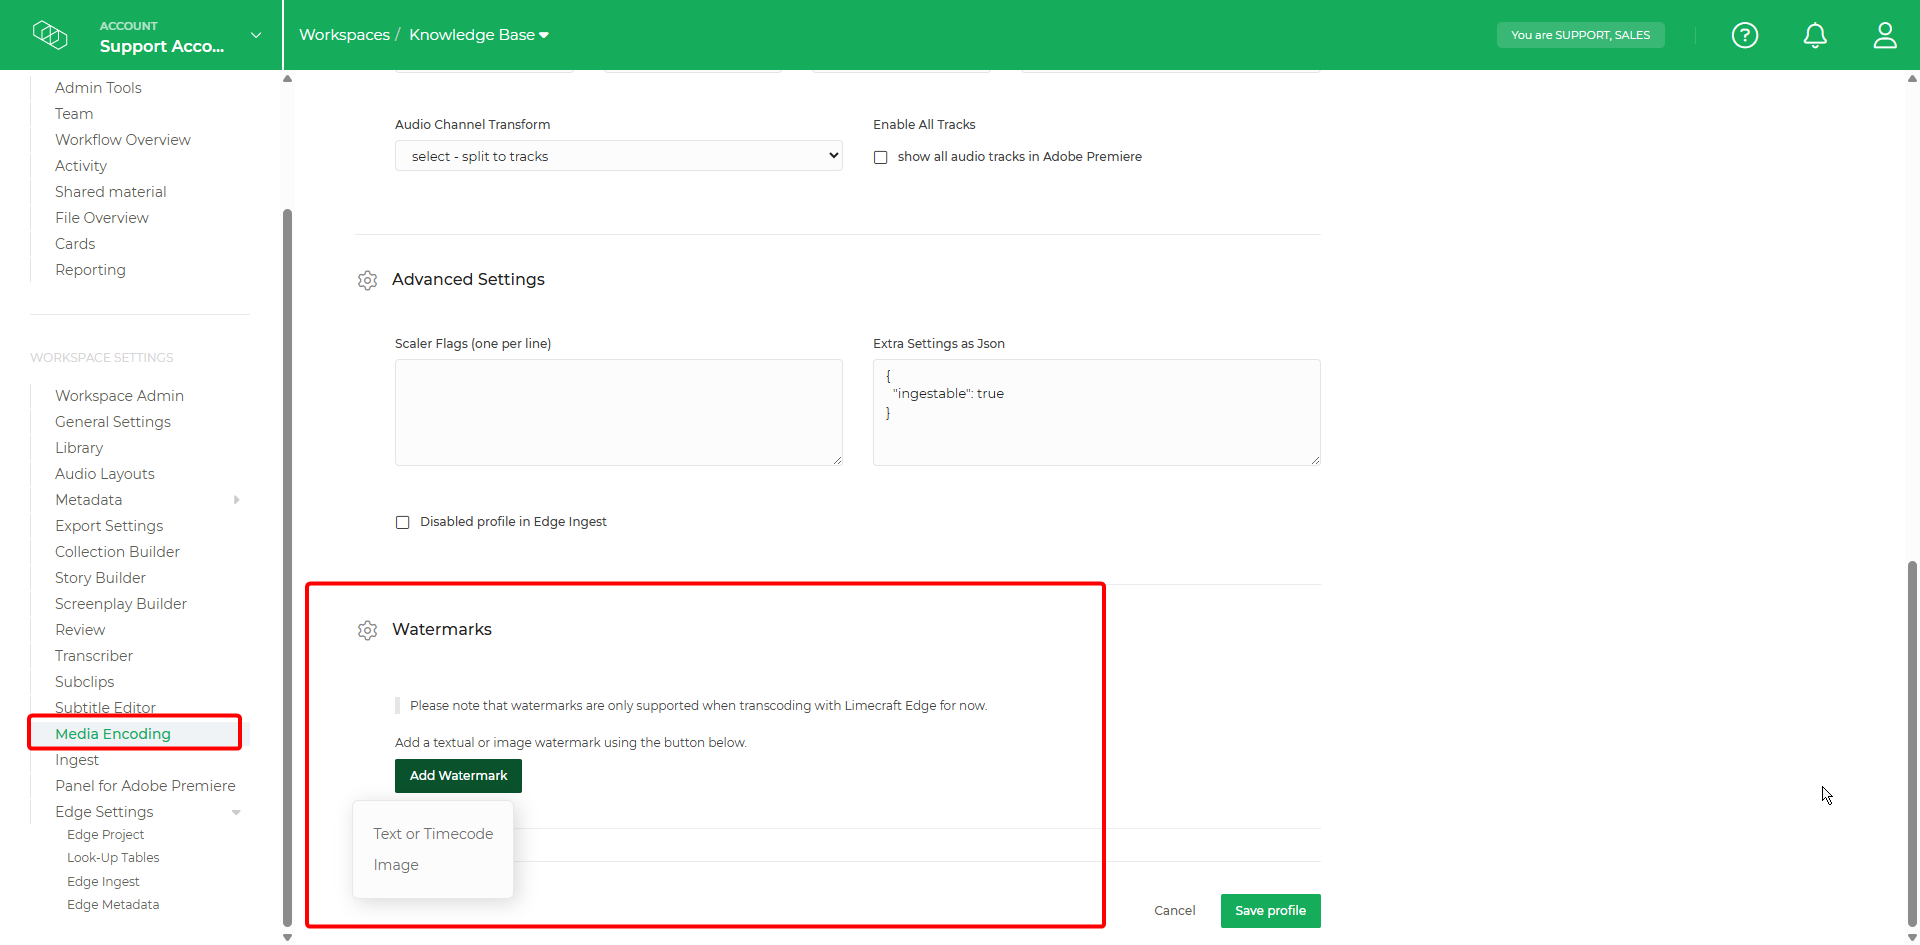
Security and Identification
Watermarking allows you to protect your intellectual property and provide essential metadata for internal workflows. You can choose to overlay:
- Custom Text or Branding: Add your company name or project title.
- Timecode Burn-in: By selecting 'Append timecode to text', you can ensure each frame displays its specific timecode. This is essential for precise feedback during review.
- Logos and Images: Upload JPEG or JPEG 2000 files (PNG supported for Mac) to act as a digital signature.
- Custom Metadata Fields: Use the hashtag symbol (#) to select dynamic metadata fields. This allows you to automatically pull information such as Scene, Take, or Reel ID directly from the metadata and display it on the video.
TIP: To burn in a frame-accurate timecode, ensure you tick the 'Append timecode to text' box when configuring your watermark.
To learn more about setting up these overlays, see our dedicated article on 'How to use watermarking'.
Configuring LUTs
In the LUT section of the Edge Settings within your workspace, you can configure custom Look-Up Tables to preserve creative intent and visual consistency throughout the post-production pipeline.
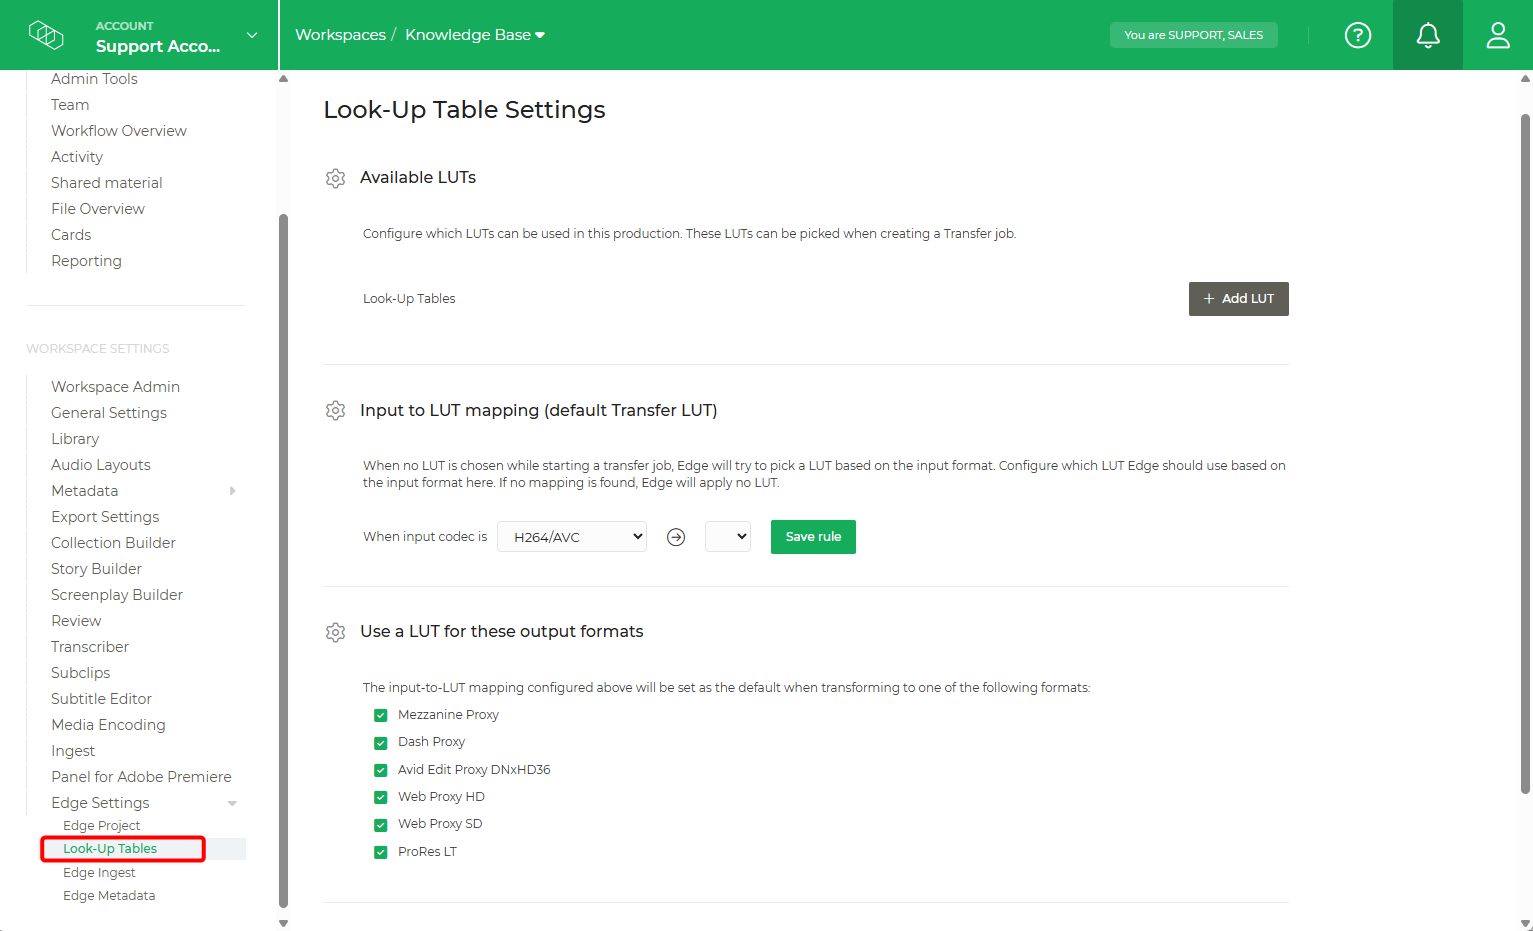
Once you have imported your LUTs, you can map them to specific input codecs and output encoding profiles. This granular control allows you to, for example, assign a specific corrective LUT for drone footage and ensure it is only applied when generating Edit Proxies, leaving other deliverables untouched.
Key Benefits
- Creative consistency: Ensure the "look" established on set carries through to the edit suite.
- Targeted Application: Avoid "baked-in" looks on files that don't require them by mapping LUTs only to specific profiles.
- Workflow Automation: Once mapped, the DIT does not need to manually select a LUT for every clip. Edge identifies the codec and applies the correct transform automatically.
For a step-by-step guide on LUTs, please navigate to our support article: How to use LUTs.
Delivery
Limecraft Edge is designed for the secure and efficient backup, ingest, and transfer of media. A critical part of project setup is the careful configuration of file transformation rules and destinations for each file type. While the earlier section focused on Encoding Profiles, this section outlines how to set up Local Storage and Ingest Templates to ensure unified and seamless delivery.
Cloud vs. Local Delivery
With Edge, you can deliver media directly to the Limecraft Workspace, where it is stored in the cloud storage linked to your account. However, when handling larger files, typically edit proxies or high-res masters, a local destination must be configured and routed within Edge.
Local storage is configured within the Edge Desktop system settings. Please refer to this article for a complete guide.

Configuring Ingest Templates
In the Edge Ingest section, you can create Ingest Templates or Destination templates to improve efficiency and maintain project governance. These templates define the target file types and storage destinations for the ingested media.

Local Storage in Ingest Templates
To use local storage within an Ingest Template, you must first define the storage volume using a placeholder in the Edge Ingest Settings (Workspace). You then map this placeholder to a physical path in the Edge Desktop System Settings.


By using Ingest templates within Limecraft Edge, you ensure project consistency and significantly reduce the risk of human error. To further streamline the user experience, you can:
- Enforce specific templates to ensure all team members follow the same protocol.
- Disable unnecessary transcoding profiles to simplify the interface.
- Promote a unified ingest process across your entire organization.

Looking for more detail? Read our full guide on How to use Ingest Templates in your Edge workflow to learn about advanced configuration and automation.
Additional Project Governance
The Edge Project Settings contain global configurations that are automatically applied to all content processed within a specific project. These settings ensure uniformity across your production:
- Imposed Frame Rate: Sets a fixed frame rate for all media ingested via Edge. This is essential for ensuring project-wide consistency, especially when working with mixed-rate source material.
- Audio Metadata Processing: Enables Edge to correctly extract Episode, Scene, and Take/Shot metadata directly from recorded audio files (e.g., BWAV files).
- Avid Tapename Settings: Defines the rules for automatically populating the "Tape Name" column, ensuring seamless relinking and organization within Avid Media Composer.
- Skip Checksum: Bypasses the checksum verification process for all material.
⚠️ Caution: While this can speed up the ingest process, it removes the safeguard against file corruption. We recommend leaving this disabled for mission-critical media.
