Limecraft Flow is an all-in-one solution for production of unscripted entertainment or documentaries. In case you are preparing the outline of a story to export to edit later, Limecraft's Storyboard app allows you to create the most compelling stories in no time. In this article, we explain how to use the story builder app.
Open the Storyboard app by clicking its button in the dark toolbar on the left. The button looks like this:

The image below gives an overview of the different parts of the Storyboard app (you can click the image to enlarge it).

- App button – Clicking it will launch the Story Builder app.
- Story listing – Lists all the stories in your production. Clicking a story will select it. At the top of the listing is a link to create a new story.
- Story part listing – List of parts in the selected story. At the bottom is a create button to create a new part in the selected story.
- Story part media contents – Clips and subclips assigned to the story part.
- Story part media toolbar – Contains actions to perform on the media assigned to the story part.
- Story part editor – This is where you edit the story part.
- The bottom of the screen shows the library.
A - E. Story parts behave like collections
It is clear the Story Builder looks very similar to the Collection Builder. Therefore it is helpful to read working with collections first before continuing. Creating and managing stories works the same as creating and managing collection groups. Creating and managing story parts works the same as creating and managing collections.
You can assign clips and subclips to story parts in the same way you would for collections.
With the Story Builder, you write your story (see below) first. As you shoot and ingest material into Flow, you can make rough cuts for each story part and export the story to your edit suite
F. Story part editor – Create A/V scripts
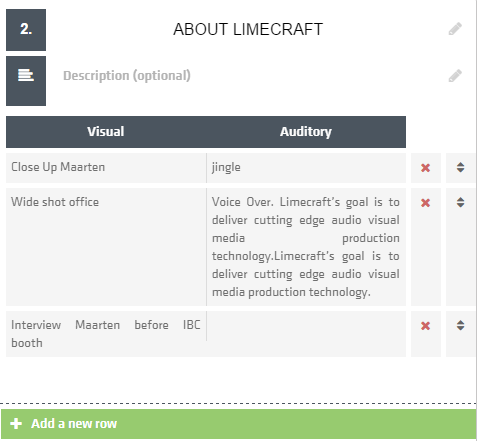
Let’s focus on something you don’t have on a collection. Each story part represents a part of the story as a table with Audio and Video columns (F in the overview image).
At the top you can give a name to your story part. Below that you can provide a description.
Below the description is the Visual / Auditory table. You add a new row to it by pressing the Add a new row button at the bottom of the editor.
You can enter text in each cell of the table. Clicking the x next to a row will delete the row. Dragging the button with the two arrows on the right of a row lets you reorder the rows.